Use Flags & Variables (TyranoBuilder)
You know how most visual novel games have ‘good endings’ and ‘bad endings’?
These games usually decide which route or ending to follow by checking flags during game play or by tracking variables, such as friendliness levels with other characters, and so on.
These types of flags and variables can be used in in TyranoBuilder games in two ways:
1. Using TyranoScript
This is highly flexible, but requires some knowledge and use of scripting.
Visit this tutorial to learn more about using variables and flags in TyranoScript.
2. Using TyranoBuilder Variable Management Functionality
This allows variables to be used without the need for scripting.Below, we’ll see how to manage flags by using TyranoBuilder variable management function.
TyranoScript and TyranoBuilder in conjunction with each other.For example, TyranoBuilder variable management can be used to perform simple calculations, and TyranoScript used when more complex calculations are required.
What are Variables?
So just what are ‘variables’?
Variables are essentially ‘containers’ that are used to store information. That ‘something’ could be, for example:
・A name that the player has input
・Friendship levels with another character
・A yes / no flag
For example, if we wanted to increase the friendship level of a character called Yuko-chan, we could first create a variable called yuko_points.
Then, when the player selects a branch which increases Yuko-chan’s friendship level, we increase the value in the yuko_points ‘container’.
It might be a little difficult to grasp from this explanation alone, so let’s create an actual game in which the friendship level changes.
Defining Variables
Before we can use a variable, we have to first define it so that it is set up and ready for TyranoBuilder to use.
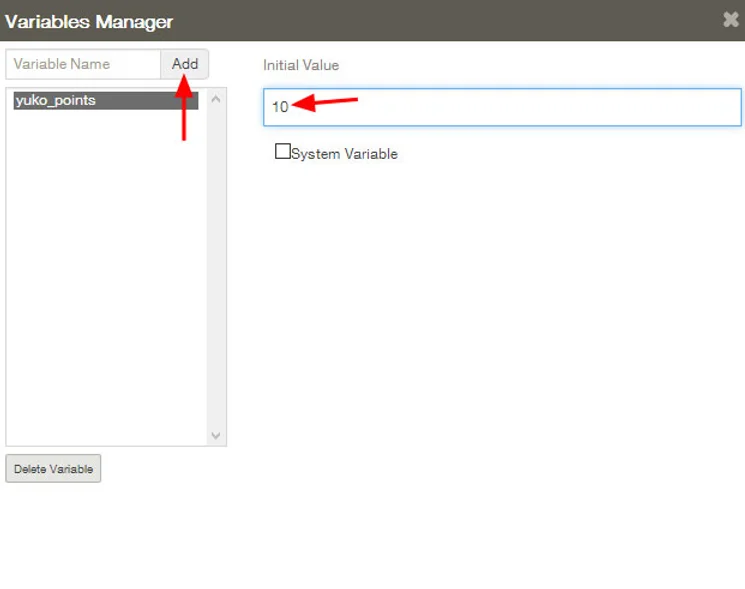
From the menu at the top of the TyranoBuilder window, select Project > Variables to open the Variables Manager.
Enter ‘yuko_points’ in the ‘Variable Name’ field and click ‘Add’ to create this new variable.
This variable will be used to track friendship level, so let’s say that 10 is the starting value. Go ahead and enter ’10’ in the ‘Initial Value’ field. (The Initial Value is the value that will be in the container when the game starts.)
Now we’re ready to use our variable.
Manipulating Values Contained in Variables
Next, we’ll make the friendship level increase or decrease depending on the branch that the player selects.
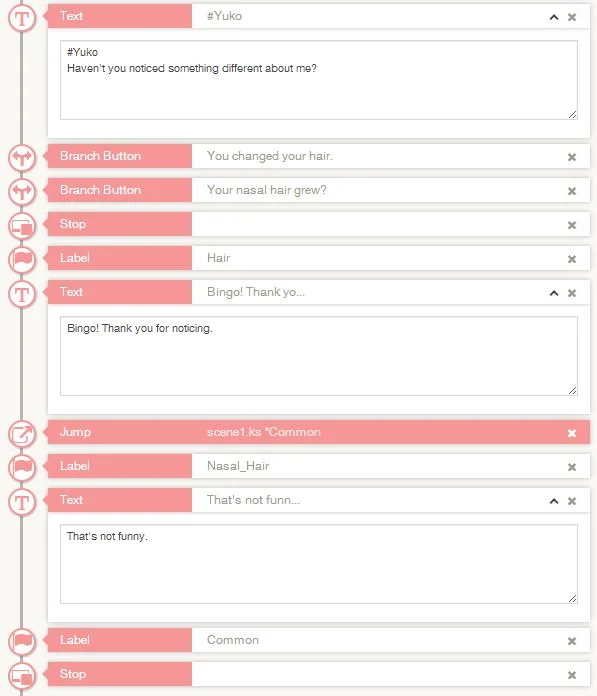
Add text to your games that asks ‘Haven’t you noticed something different about me?’ and two branch buttons:
‘Did you change your hair?’
‘Your nasal hair grew?’
Then we’ll make the friendship level increase for the first response and decrease for the other.
Let’s go ahead and create a simple branch. Create the scenario like this:
Preview the game and make sure that the branch is working correctly.
Now, we’ll add the processes that increase and decrease the friendship value for each branch.
Drag and drop the Process Variable component from the Tools area (at the left of the screen) into the Scene Editor (center screen). ,


The first operation is to ‘increase the friendship level’, so let’s place it after the label ‘Hair’.
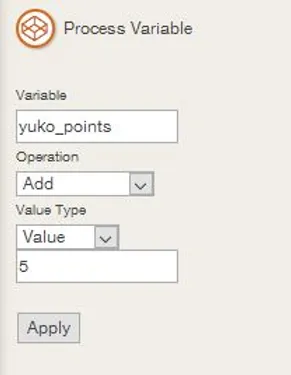
Let’s add 5 to the variable yuko_points in this case.
With the Process Variable component selected, enter ‘yuko_points’ as the Variable in the Parameters area (at the right of the window), set the Operation type to ‘Add’, type ‘5’ in field below the Value Type, and click ‘Apply’. Here’s how it should look:
In the same way, set up a new Process Variable component that subtracts 5 for the Nasal_Hair’ branch.
There! We created a game in which the friendship level changes depending on the branch that the player selects.
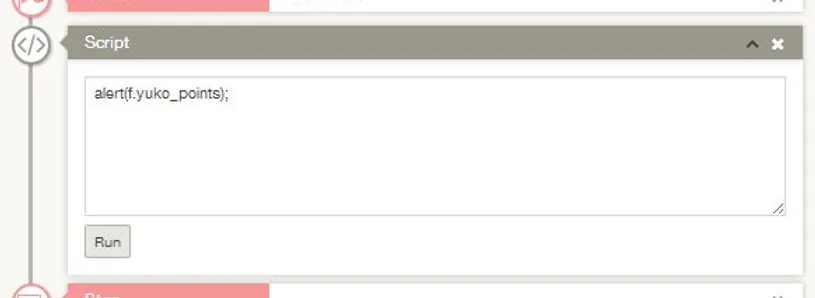
To confirm that the value contained in the yuko_points variable really does change, we can add some iscript to confirm the value.
After the label ‘Common’, drag and drop an iScript component from the Tools area and enter the following script:
Preview the game and you should see that the friendship level branch changes depending upon the selected branch.
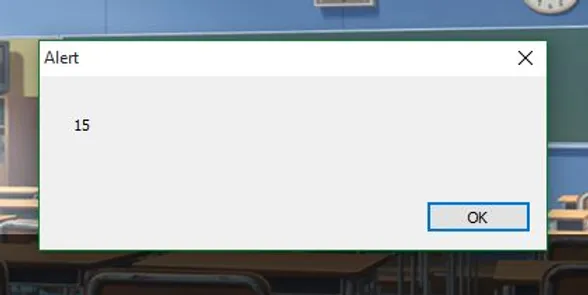
In the above example, the initial value was 10, the ‘Hair’ branch was selected and the value of yuko_points is 15.
Branching Stories Using Variable Values
Now you know how to define variables and freely change their values.
To finish up, we’ll set up the game to show a different scene depending on whether the player’s confession of love to Yuko succeeds or fails.
At the end of the above project, let’s have the player character declare “I’m in love with you!” and the outcome will be decided depending upon the friendship level with Yuko.
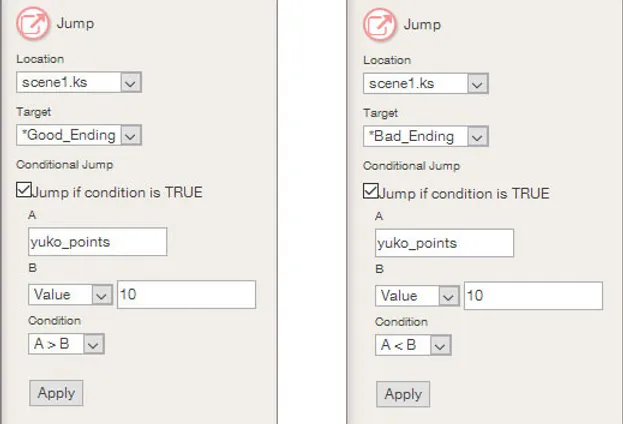
To branch a story depending on the value of a variable, we use the Jump component.
Add text and two Jump components as below.

Now we’ll make the story branch to Good_Ending or Bad_Ending, depending on the value held by yuko_points.
In the Parameters area of the Jump components is the check box marked ‘Jump if condition is TRUE’.
If this box is checked, a Jump component will execute only if the defined condition is met.
Set up the jumps for Good_Ending and Bad_Ending jumps like this:
So…
If yuko_points is greater than 10, the scenario will branch to Good_Ending.
If yuko_points is less than 10, the scenario will branch to Bad_Ending.
Now, preview the whole game and you should see that
So what do you think?
You now have the power to easily create games with complex strategic elements!
Random Variables
Sometimes you might wish to add a degree of randomness to a variable value.
In this case, set the variable as below and each time it will receive a different value.
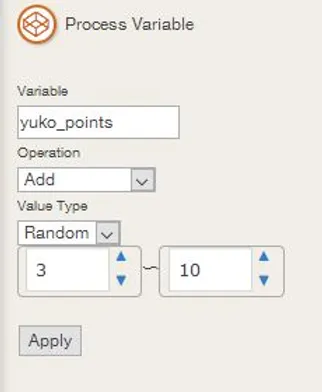
In the above example, a random number between 3 to 10 is added.
System Variables
These variables are shared by the entire game. For example, a variable that tracks “How many times has the player completed the game?”, which wouldn’t be reflected in a save file, is this type of variable.
When you define a variable, check the box marked ‘System Variable’ and the variable will be shared by the whole game.